- QR Generator
- Pricing
- FAQ
How to Convert Images to QR Codes Using DeepQR: A Step-by-Step Guide
Welcome to DeepQR, your go-to platform for creating versatile and dynamic QR codes. In this tutorial, we'll guide you through the process of converting your images into QR codes using DeepQR, a powerful tool designed to make QR code generation easy and efficient.
Image QR codes are incredibly useful for a variety of applications. Whether you're looking to share artwork, product images, event photos, or any other type of visual content, embedding images into QR codes offers a seamless way to share and distribute visual information. With DeepQR, you can create image QR codes that are not only functional but also customizable to fit your branding and aesthetic needs.
In the following sections, we'll provide a step-by-step guide on how to use DeepQR to convert your images into QR codes. From uploading your images to customizing and generating the final QR code, we've got you covered. Let's get started!
Getting Started with DeepQR
To start converting images to QR codes with DeepQR, follow these simple steps. Our website is designed to be user-friendly and intuitive, ensuring a seamless experience even for first-time users.
Visit the DeepQR Website
Open your web browser and go to DeepQR. On the homepage, you will find a clear navigation menu and the main interface for your operations.
Sign Up or Log In
If you don't have an account yet, click on the “Dashboard” button at the top right corner of the page. You can register using your email address or Google account. The registration process is straightforward and takes just a few steps. If you already have an account, simply log in.
Click the “Add Component” Button
On the homepage, find and click the “Add Component” button. This will open a component selection panel where you can choose the type of component you want to add.
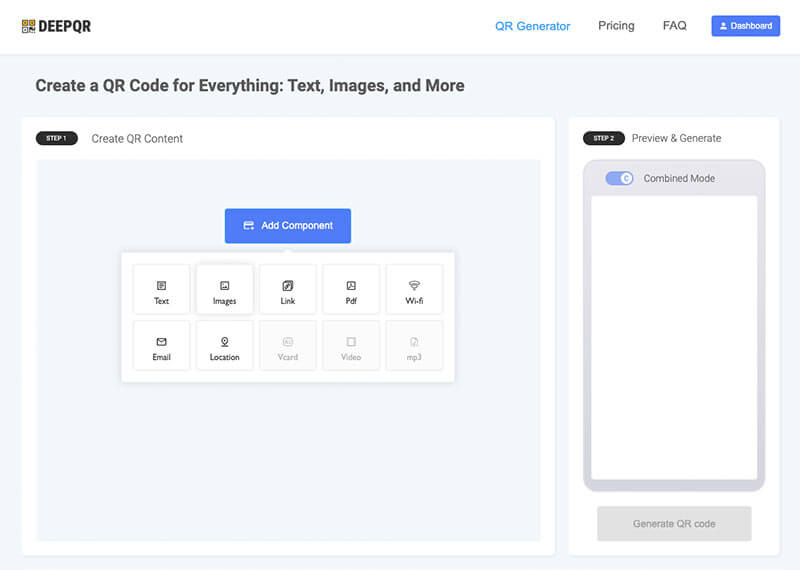
Select the “Image” Component
In the component selection panel, click on the “Image” component. This will bring up an image upload dialog box where you can upload the image you want to convert into a QR code.
Adding an Image Component
Adding an image component to your QR code using DeepQR is a straightforward process. Follow these detailed instructions to ensure a smooth experience.
Open the Component Selection Panel
After clicking the “Add Component” button on the homepage, a panel will appear displaying different types of components you can add.
Select the “Image” Component
In the component selection panel, locate and click on the “Image” component. This action will open an image upload dialog box.
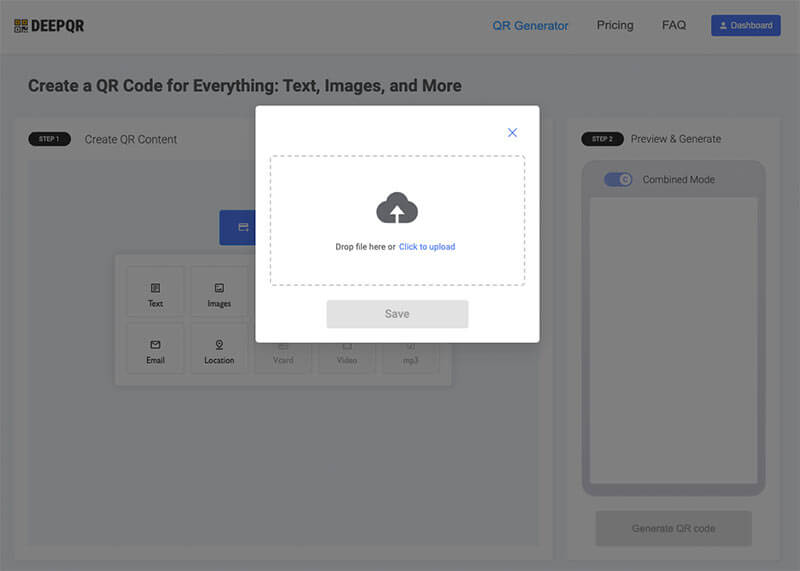
Upload Your Image
In the image upload dialog box, click on the upload area to choose an image file from your local device. DeepQR supports JPG and PNG formats, ensuring compatibility with most common image types. Select your desired image and wait for the upload to complete.
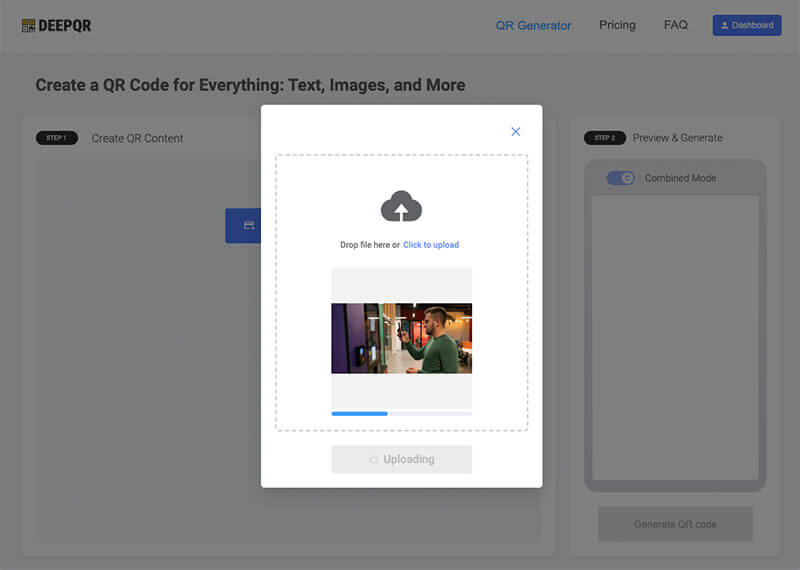
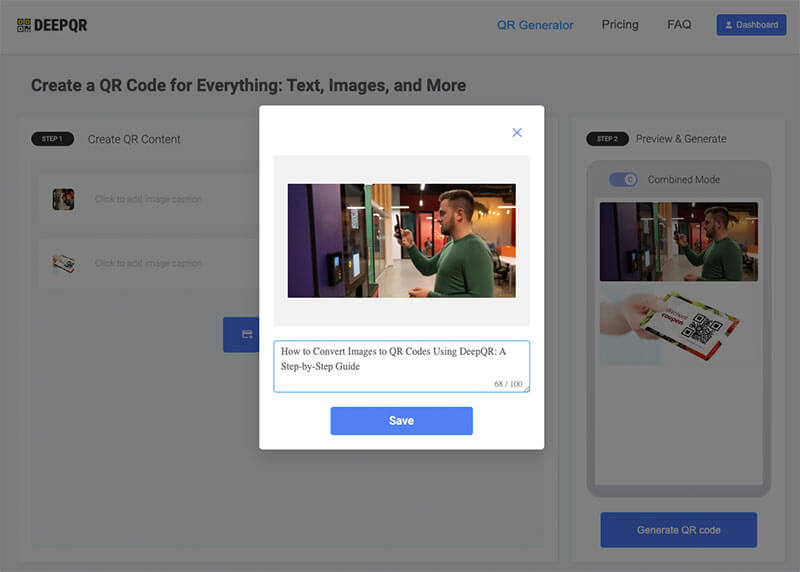
Preview and Save
Once your image is uploaded, it will appear in the dialog box. If the image looks correct, click the “Save” button to close the dialog box and add the image component to your QR code. The main interface will now display the newly added image component.
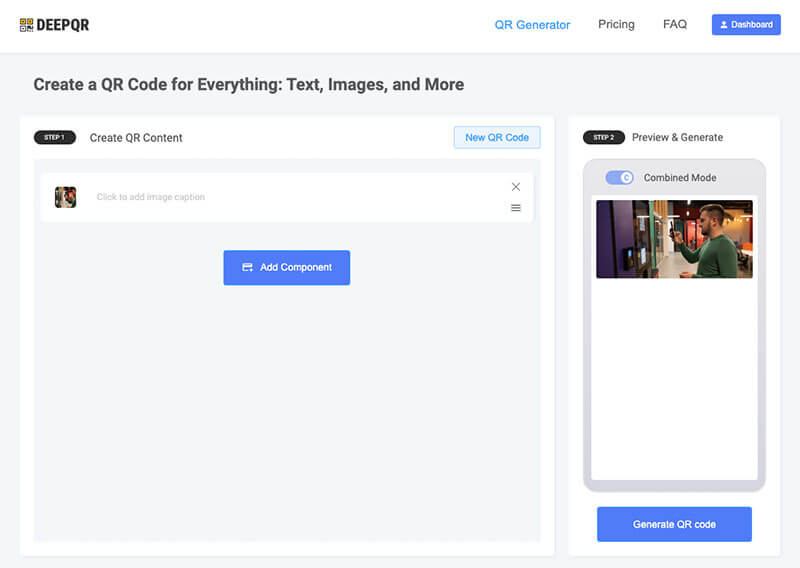
Real-Time Preview
On the right side of the screen, you will see a real-time preview of your QR code with the newly added image. This feature allows you to see exactly how your QR code will look when scanned.
Supported Image Formats
DeepQR currently supports two common image formats: JPG and PNG. These formats ensure high-quality image rendering and are widely used for various types of visual content.
Uploading and Customizing Images
In this section, we'll walk you through the process of uploading your images to DeepQR and customizing them to fit your needs. Follow these steps to ensure a smooth experience.
Step-by-Step Guide on Uploading Local Image Files
1. Open the Image Upload Dialog:
After selecting the “Image” component from the component selection panel, an image upload dialog box will appear.
2. Choose Your Image:
Click on the upload area within the dialog box to open your device's file explorer. Navigate to the folder containing the image you want to upload, select the file (JPG or PNG format), and click “Open”. The upload process will begin immediately.
3. Wait for the Upload to Complete:
Once you select your image, a progress bar will indicate the upload status. When the upload is complete, the image will be displayed in the dialog box.
Adding Multiple Image Components to a Single QR Code
1. Repeat the Upload Process:
To add multiple images, simply repeat the upload process. Click the “Add Component” button again, select “Image”, and upload another image. Each image will be added as a separate component within the QR code.
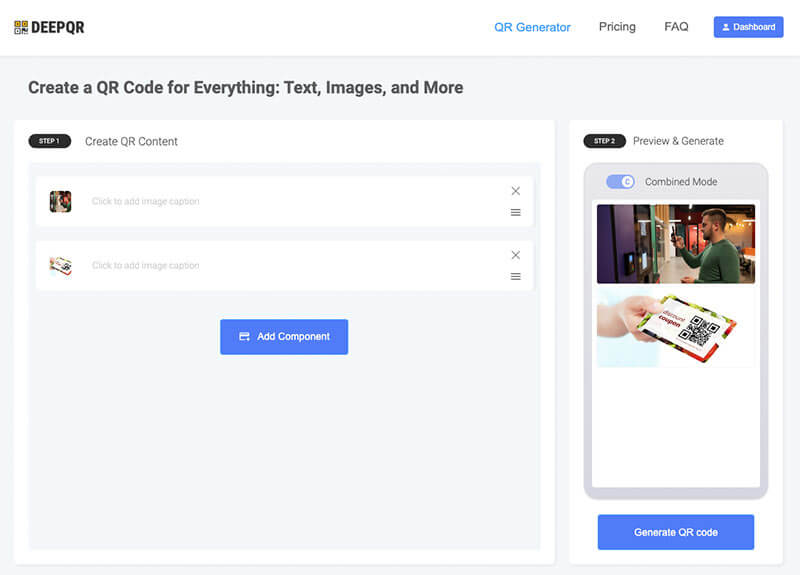
2. Manage Multiple Images:
You can add as many images as you need. Each image component will be displayed on the main interface and in the real-time preview.
Editing Image Titles and Adjusting Image Order
1. Edit Image Titles:
Click on any added image component to open its editing dialog box. In the dialog box, you will find an option to add a title to your image. Enter the desired title, and it will appear below the image in the QR code.

2. Adjust Image Order:
To rearrange the order of the images, simply drag and drop the image components in the main interface. The real-time preview on the right will update automatically to reflect the new order.
Real-Time Preview Feature and Its Benefits
The real-time preview feature is one of DeepQR's most powerful tools. As you add, edit, and rearrange your image components, the preview on the right side of the screen updates instantly. This allows you to see exactly how your QR code will look when scanned. The benefits of this feature include:
- Immediate Feedback: Instantly see the results of your changes, ensuring your QR code looks exactly how you want it.
- Error Reduction: Spot and correct mistakes in real-time, minimizing the risk of publishing incorrect QR codes.
- Enhanced Customization: Experiment with different layouts and designs quickly and easily, helping you create the perfect QR code.
Generating the QR Code
Once you have uploaded and customized your images, it's time to generate your QR code. Follow these instructions to complete the process.
Instructions on How to Generate the QR Code
1. Finalize Your Design:
Make sure you have added all the desired image components and customized them to your satisfaction. Check the real-time preview to ensure everything looks correct.
2. Click the “Generate QR Code” Button:
At the bottom of the preview area, you will find the “Generate QR Code” button. Click this button to start the QR code generation process.
3. Wait for Processing:
The system will process your QR code. This might take a few seconds, depending on the complexity and number of components. Once the processing is complete, your QR code will be displayed in the preview area.
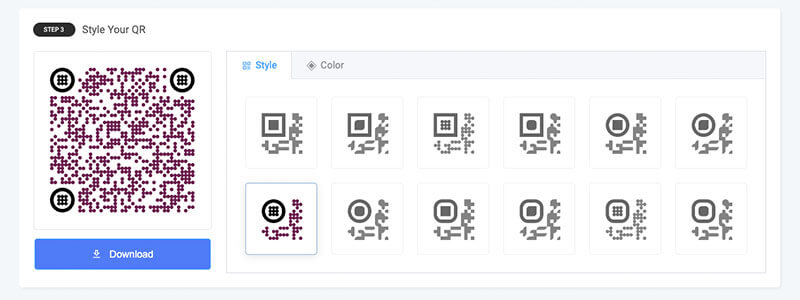
Customizing QR Code Styles and Colors
1. Open the Style Customization Panel:
After your QR code is generated, you can further customize its appearance. Look for the style customization options near the preview area.
2. Choose a Style:
Select from various styles to change the overall look of your QR code. Options may include different patterns, frames, and shapes.
3. Adjust Colors:
Customize the colors of your QR code to match your branding or personal preferences. You can change the color of the QR code itself as well as the background color.
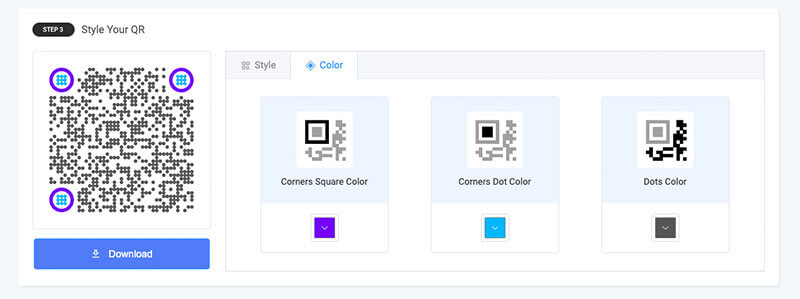
4. Preview Your Changes:
As you adjust styles and colors, the real-time preview will update to show how your QR code will look. This helps ensure that the final design meets your expectations.
Downloading the Final QR Code
1. Finalize Customizations:
Once you are satisfied with the style and color customizations, make sure everything is set correctly in the preview area.
2. Click the “Download” Button:
Near the preview area, you will find the “Download” button. Click this button to download your final QR code. The file will be saved in a high-quality format suitable for printing and sharing.
3. Save the File:
Choose the location on your device where you want to save the QR code file. Make sure to remember this location for easy access later.
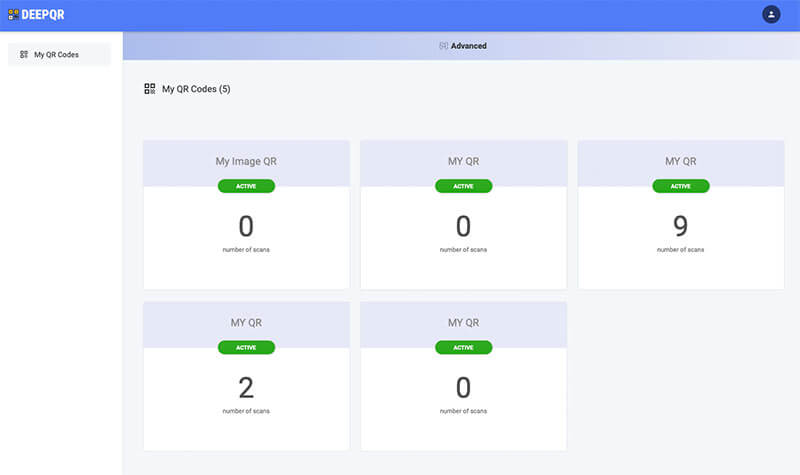
Managing Created QR Codes
After creating your QR codes, you can easily manage and edit them using the DeepQR Dashboard. This section will guide you on how to access, edit, and maintain your saved QR codes.
Accessing and Editing Saved QR Codes in the Dashboard
1. Access the Dashboard:
Log in to your DeepQR account and navigate to the Dashboard. You can do this by clicking on the “Dashboard” button located at the top right corner of the homepage.
2. View Your QR Codes:
In the Dashboard, you will see a list of all the QR codes you have created. Each entry will display the creation date, QR code name, and other relevant details.
3. Select a QR Code to Edit:
Click on the QR code you wish to edit. This will open a detailed view of the QR code. Click the "Edit QR" button to begin editing. This action will automatically return you to the homepage and open the QR code in edit mode.
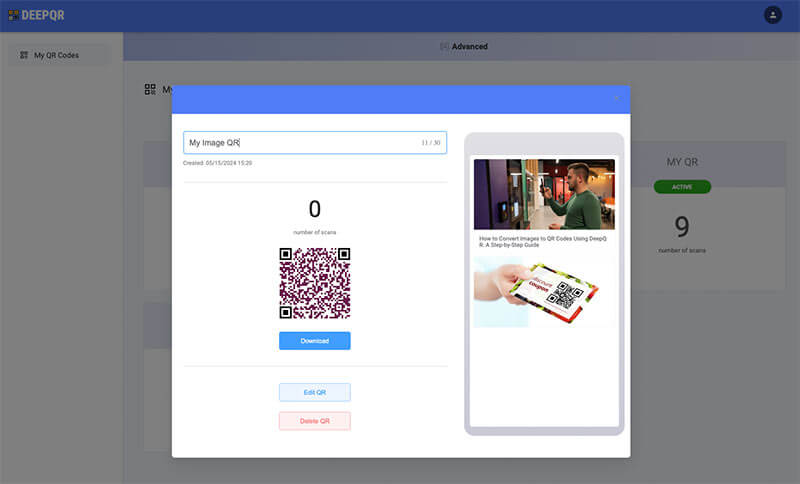
4. Edit the QR Code:
In edit mode, you can change the QR code components, such as updating images, modifying titles, or adjusting the order of the components. You can also change the QR code’s style and color settings.
5. Save Your Changes:
After making the desired edits, click the “Save” button to update the QR code. The changes will be saved instantly, and the updated QR code will be available for download.
Modifications Do Not Affect Printed QR Codes
A key feature of DeepQR is that any modifications you make to your saved QR codes do not affect the functionality of previously printed QR codes. This means:
- Persistent Functionality: Even if you change the content or appearance of a QR code in the Dashboard, any QR codes that have already been printed and distributed will still work as intended.
- Easy Updates: You can update the information embedded in your QR codes at any time without worrying about the impact on printed materials. This is especially useful for maintaining up-to-date content for marketing materials, product packaging, and event promotions.
- Flexible Customization: Feel free to experiment with different designs and content updates, knowing that your printed QR codes remain reliable and functional.
Conclusion
Converting images to QR codes using DeepQR is a simple and efficient process. Here's a quick recap of the steps:
1. Visit the DeepQR Website:
Navigate to DeepQR and log in or sign up for an account.
2. Add an Image Component:
Click on the “Add Component” button, select the “Image” component, and upload your desired image.
3. Customize Your QR Code:
Add multiple image components if needed, edit image titles, and adjust the order of images. Use the real-time preview to ensure everything looks perfect.
4. Generate and Customize the QR Code:
Click the “Generate QR Code” button, then customize the style and colors of your QR code.
5. Download and Manage Your QR Code:
Save the final QR code and manage it through the Dashboard, making any necessary edits without affecting previously printed versions.
We encourage you to try out this feature and explore the various QR code options available on our site. Whether you need QR codes for business, events, or personal use, DeepQR offers a versatile and user-friendly solution.
Ready to get started? Sign up for a free account today and begin creating your own customized QR codes with DeepQR. Unlock the potential of QR codes to enhance your marketing, share visual content, and more!