
Getting Started
Updated At 08/06/2024

At DeepQR, you can start exploring the rich customization features of QR codes with just a few simple steps. Let’s walk you through the entire process from registering an account to creating a basic text and image QR code. Begin your smart QR code journey now!
Registration and Login
Registering and Logging In
- Visit DeepQR Official Website
- Open your browser, enter DeepQR’s official website address (https://deepqr.com), and go to the homepage.

Access the Dashboard
- Click the “Dashboard” button on the top navigation bar.
- If you are using a mobile device, first click the sidebar button in the top left corner, then select “Dashboard” from the sliding menu.
Registration and Login Dialog Box
- If you haven’t registered or logged in, a registration and login dialog box will automatically pop up.

- Choose Your Registration Method
- Google Account One-Click Login: Click the “Google Account One-Click Login” button, follow the prompts to authorize your Google account, and complete the registration.
- Email Registration:
- Enter your email address in the corresponding input field.
- Click the “Continue with Email” button. The system will send a confirmation email to your provided address.
- Open your email, find the confirmation email from DeepQR, and click the “Sign in to DeepQR” link.
- The system will redirect you back to the website and complete the login process.


Logging Out
Access the Dashboard
- Ensure you are logged in and on the Dashboard page.
Click Your Avatar
- Find and click your avatar on the right side of the navigation bar.
Select Logout
- Click the “Logout” button in the dropdown menu to log out.

- Next Login
- To log in next time, repeat the registration and login steps. The login method will be the same as your chosen registration method.
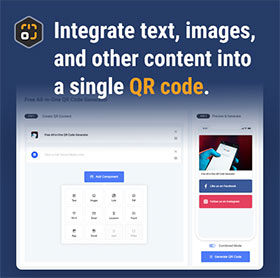
Creating Your First QR Code
Creating a Text and Image QR Code
Access the QR Code Content Editing Area
- Visit the DeepQR homepage and find the QR code content editing area.
Add a Text Component

- Click the “Add Components” button.
- Select the “Text” component from the list.
- Enter your text content in the pop-up text editor. You can format the text (e.g., bold, align, list).
- After editing, click the “Save” button to save the text component.

- Add an Image Component
- Click the “Add Components” button again.
- Select the “Image” component from the list.
- Upload an image file (supports common formats like PNG, JPEG).
- After uploading, click the “Save” button to save the image component.

- Preview and Adjust Layout
- Once the components are added, you can see a real-time preview of the QR code.
- Drag the components up and down to adjust the text and image layout.
- Click on the added components for further editing.
- For example, click the image component to add a text note in the pop-up editor.

- Generate the QR Code
- After editing the content, click the “Generate QR Code” button below the preview area.
- On the generated QR code page, you can further customize the QR code’s style, including color, shape, and adding a logo.

- Download the QR Code
- Once all modifications are complete, click the “Download” button to download the QR code.
- Choose from various download formats (e.g., PNG, SVG) based on your needs.

Start your journey with DeepQR today and explore the endless possibilities of QR code customization!
On this page