App Component

Component Overview
The APP component allows you to create QR codes that directly guide users to download your app. Whether you’re promoting a new application or making it easier for users to find your app, this component simplifies the process in just a few steps. It supports major platforms like the Apple App Store and Google Play, making it suitable for various device users.
Key Features:
- Multi-Platform Links: A single QR code can support multiple app store links, catering to the download needs of users on different devices.
- Smart Redirect: Automatically redirects users to the appropriate app store based on their device type, eliminating the need for manual selection.
- Easy Setup: Simply enter your app’s link to generate a QR code—no complex configurations required.
Quick Start Guide
Getting Your APP Download Links
To use the APP component, you first need to have the download links for your app ready. Here’s a quick guide on how to get these links from the Apple App Store and Google Play Store:
Apple App Store
- Open the App Store: On your iPhone or iPad, open the App Store app.
- Search for Your App: Enter your app’s name in the search bar and tap “Search.”
- Go to the App Details Page: Find your app in the search results and tap to open its details page.
- Get the Link:
- On the app details page, tap the share icon (a square with an upward arrow) in the upper right corner.
- Select “Copy Link” to copy the app’s download link to your clipboard.
Google Play Store
- Open Google Play Store: On your Android device, open the Google Play Store app.
- Search for Your App: Enter your app’s name in the search bar and tap the magnifying glass icon to search.
- Go to the App Details Page: Find your app in the search results and tap to open its details page.
- Get the Link:
- On the app details page, tap the menu button (three dots) in the upper right corner.
- Select “Share” and then choose “Copy to Clipboard” to copy the app’s download link.
Adding the APP Component

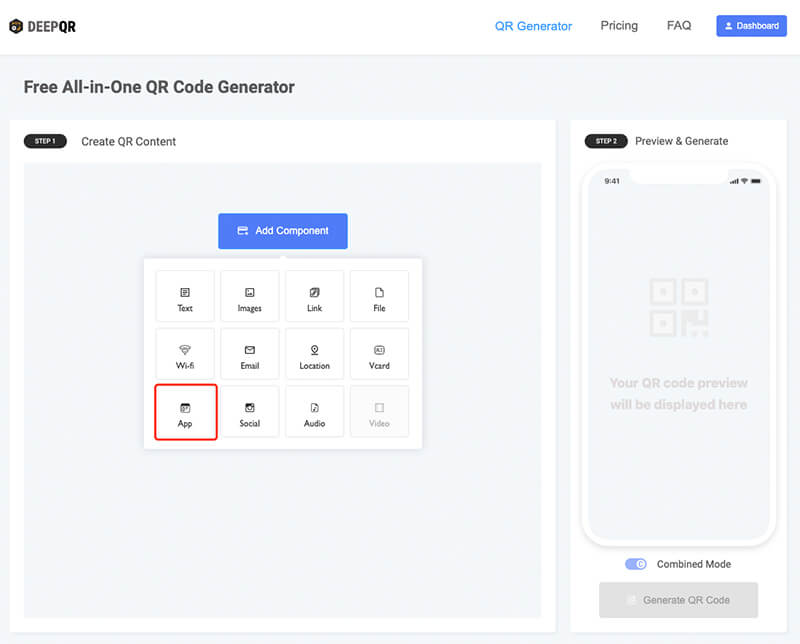
- On the DeepQR homepage, click the “Add Component” button. In the pop-up component panel, select the “App” component.

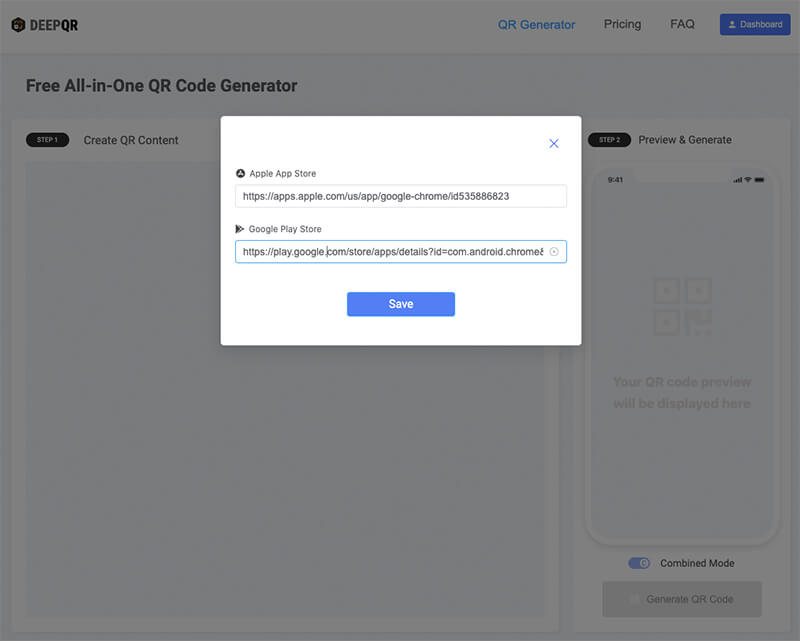
- In the APP component editing dialog, enter the links you obtained for both the Apple and Google apps, then click the “Save” button to save your settings.

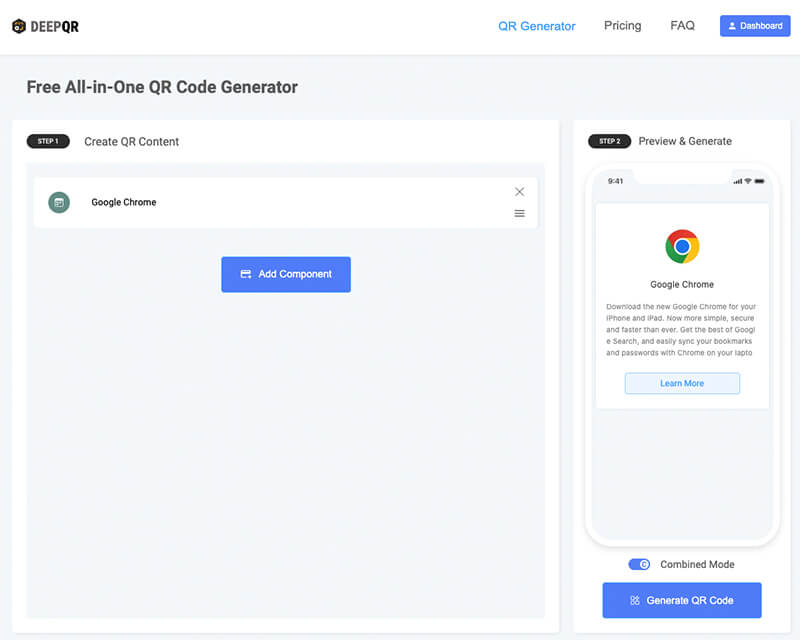
On the main interface, you can see the effect of adding the APP component in the preview area. By default, it is displayed in Combined mode, where the app appears as a card, and users need to tap the card after scanning the QR code to be redirected to the app store for download. If switched to SOLO mode, users will be directly redirected to the app store after scanning the QR code.
SOLO Mode vs. Combined Mode
Below the preview area, you can toggle between SOLO mode and Combined mode using the buttons. Here’s the difference between the two modes:
SOLO Mode
- Users are taken directly to the app download page after scanning the QR code.
- You cannot add other components to the QR code.
Combined Mode
- After scanning the QR code, users first see an app card and must tap the card to be redirected to the app store download page.
- You can add other components to the QR code (such as text, images, links, etc.).
Frequently Asked Questions
Will the QR code automatically redirect users to the appropriate app store based on their device?
Yes, when users scan the QR code, the system will recognize the device’s operating system. For example, in Combined mode, it displays the app store download page that matches the device's OS. In SOLO mode, users are automatically redirected to the corresponding app store download page (Android devices go to the Google Play Store, while iPhones go to the App Store).

